3D Studio Max: It’s the industry standard, right? But honestly, getting a handle on this beast can feel like trying to navigate a labyrinth blindfolded. This guide isn’t just another dry tutorial; we’re diving deep into the nitty-gritty, from basic interface navigation to advanced animation techniques. Think of it as your survival kit for conquering the world of 3D modeling, texturing, animation, and rendering – all within the powerful framework of 3D Studio Max.
We’ll break down complex processes into digestible steps, helping you build skills and confidence along the way. Get ready to level up your 3D game!
This guide covers everything from setting up your initial workspace and understanding workflows to mastering advanced techniques like physically based rendering (PBR), creating realistic lighting, and animating complex characters. We’ll explore various modeling techniques, dive into different render engines, and even show you how to leverage plugins to boost your productivity. We’ll also tackle common troubleshooting issues, helping you avoid those frustrating crashes and rendering errors.
By the end, you’ll have a solid foundation in 3D Studio Max and be ready to tackle your next big project.
3D Studio Max Interface and Workflow
Okay, so you’ve got the intro and outro handled, awesome! Let’s dive into the nitty-gritty of 3D Studio Max. This guide will give you a solid foundation in navigating the interface and completing a basic modeling workflow. We’ll also touch on some key differences between recent versions.
3D Studio Max Interface Overview
The Max interface, while initially daunting, is actually pretty logical once you get the hang of it. The main screen is divided into several key areas. You’ve got your main viewport, where you see your 3D model. Surrounding this are toolbars, menus, and panels that give you access to all the tools and settings. The Command Panel, usually docked to the right, is where you’ll find most of your object and modifier settings.
The main menu bar at the top offers access to file management, rendering, and various other options. Familiarize yourself with the customizable workspaces – you can rearrange and dock panels to suit your preference. Think of it like setting up your own digital sculpting studio!
Creating a Simple 3D Model: A Step-by-Step Guide
Let’s create a simple cube, then extrude it to make it more interesting. First, go to the Create panel (usually found in the main toolbar). Select “Standard Primitives,” then click “Box.” Click and drag in the viewport to create your cube. Now, select the cube. In the Modify panel, you’ll find a ton of options.
We’ll use the “Extrude” modifier. Click “Add Modifier” and select “Extrude.” Adjust the “Amount” value to extrude the top face of the cube upwards, creating a simple building-like shape. You can further refine this by using the selection tools to adjust vertices, edges, or faces, giving you complete control over your model’s shape. Finally, you can apply materials and lighting to make it look more polished.
This basic workflow is the foundation for far more complex models.
Comparison of 3D Studio Max Versions (2023 vs. 2024)
While many features carry over, there are some key differences between versions. Here’s a quick comparison:
| Feature | 3ds Max 2023 | 3ds Max 2024 | Notes |
|---|---|---|---|
| Arnold Renderer | Included | Included, with performance enhancements | Expect faster render times and potentially improved features. |
| Viewport Performance | Generally good | Improved, especially with complex scenes | Noticeable improvements in navigation and manipulation of large models. |
| Modeling Tools | Standard set of tools | Minor updates and refinements | Incremental improvements, often focusing on usability. |
| USD Support | Basic support | Enhanced support and integration | Better interoperability with other software using the Universal Scene Description (USD) format. |
Modeling Techniques in 3D Studio Max

Okay, so we’ve covered the basics of the Max interface. Now let’s dive into the fun stuff: actuallymaking* things. This section will walk you through some key modeling techniques, focusing on creating realistic characters and complex environments. We’ll also compare different approaches so you can choose the best tool for the job.
3D modeling in Max is all about building shapes and forms digitally. There are tons of different ways to do this, each with its own strengths and weaknesses. Mastering a few core techniques will give you the foundation to tackle any project.
Realistic Human Character Modeling Using Polygon Modeling
Polygon modeling is the bread and butter of character creation. It involves building a mesh of polygons (triangles and quads) to create the desired form. Think of it like sculpting with digital clay. The process typically starts with a basic shape, like a box or a sphere, and gradually refines it through edge loops, extruding, and beveling.
For a realistic human character, you’d start with a base mesh – perhaps a simple humanoid form. Then, you’d begin adding detail by subdividing the mesh, creating loops around the eyes, mouth, nose, and other features. You’d use extrude and bevel tools to sculpt the muscles, adding subtle curves and bulges. Remember to maintain clean topology – meaning an organized and efficient polygon arrangement – for better animation and texturing later on.
Think about edge loops following the underlying musculature for a more natural look. High-poly modeling is often used to create detailed sculpts, followed by retopology to create a lower-poly model suitable for animation and game engines.
Complex Environment Creation Using Spline Modeling
Spline modeling is perfect for creating smooth, organic shapes and curves. Unlike polygon modeling, which uses polygons, spline modeling uses mathematical curves. This makes it ideal for things like roads, rivers, or even the smooth curves of a futuristic spaceship.
Creating a complex environment with splines often involves a combination of techniques. You might start by laying down basic spline paths for roads or rivers. Then, you can use these splines as profiles to create 3D objects, using tools like the “Sweep” modifier to extrude the spline along a path. You can also use splines to create shapes for buildings, using the “Lathe” modifier to rotate a spline around an axis, generating a 3D form.
Think about using different spline types – like Bezier or B-spline – depending on the level of control you need over the curve. The key is to plan your layout effectively, ensuring efficient use of splines and modifiers to avoid creating overly complex scenes.
Comparative Analysis of Modeling Techniques
Let’s compare a couple of popular methods: box modeling and sculpting.
Box modeling, as the name suggests, starts with a simple cube and gradually builds up complexity by adding, subtracting, and manipulating geometry. It’s a great method for hard-surface modeling (like buildings or vehicles) because it allows for precise control over the underlying polygon structure. Sculpting, on the other hand, uses digital brushes to add and remove material from a virtual clay-like model.
It’s more intuitive and organic, well-suited for characters and organic forms, but requires more post-processing to achieve a clean, game-ready mesh.
The choice between these methods (and others like NURBS modeling) really depends on the project’s requirements. For example, a stylized cartoon character might be better suited to box modeling, while a highly realistic human character might benefit from a sculpting approach followed by retopology.
Materials and Texturing in 3D Studio Max
Okay, so we’ve nailed down the interface and modeling, now let’s dive into the juicy stuff: materials and textures. This is where your 3D models truly come alive, transforming from basic shapes into believable, realistic objects. Getting a good grasp of materials and texturing is key to creating professional-looking renders.
In 3D Studio Max, materials define the visual properties of your objects – their color, reflectivity, roughness, and more. Textures add detail and realism, providing surface variations like wood grain, scratches, or a worn-out look. We’ll cover how to create both physically-based materials (PBR) and utilize various texturing techniques to bring your designs to the next level.
Creating a Physically Based Rendering (PBR) Material
Let’s create a PBR material for a wooden table leg. First, you’d select your object in the viewport. Then, in the Material Editor, you’d create a new Standard material. This material type is designed for PBR workflows, meaning it simulates how light interacts with real-world materials. You’d then adjust the various parameters:
- Base Color: Select a brownish color, perhaps a slightly mottled one to suggest the natural variations in wood. You can use a color picker or input specific RGB values. For example, a dark reddish-brown might work well.
- Metallic: Set this value to very low (close to 0). Wood is not a metallic material.
- Roughness: This is crucial for realism. A higher roughness value (closer to 1) will create a more matte, less reflective surface, characteristic of most wood types. Experiment with values between 0.5 and 0.8 to achieve a natural look.
- Subsurface Scattering: A small amount of subsurface scattering can give wood a more natural translucency. Experiment with this parameter to see how it affects the final appearance. A subtle amount is often enough to achieve a realistic look.
- Normal Map: This is where we bring in the texture. We’ll discuss this more in the next section, but a good wood grain normal map will significantly enhance realism.
By tweaking these parameters, you can achieve a highly realistic wood material. Remember, experimentation is key!
Creating Realistic Textures Using Procedural and Image-Based Methods
There are two main ways to create textures: procedurally and using image-based methods.
Procedural Textures: These are generated within 3D Studio Max using mathematical algorithms. They’re great for creating repetitive patterns like wood grain, brick, or marble. The advantage is that you can easily modify parameters to fine-tune the appearance. For instance, the ‘Wood’ procedural texture offers controls for grain direction, variation, and color. It’s incredibly versatile and allows for quick iterations and variations.
Image-Based Textures: These are created externally using photo editing software or scanned from real-world objects. High-resolution photographs of wood, metal, or fabric can be used to create realistic textures. You can find many free and commercial textures online. Once you import the image, you might need to adjust its mapping and potentially create a normal map from the image to add depth and realism.
Managing and Utilizing Material Libraries
Effectively managing your materials is crucial for any project, especially larger ones. 3D Studio Max allows you to organize your materials into libraries.
Creating a library helps keep your materials organized and easily accessible. This is especially useful for frequently used materials or those for a specific project. You can save your custom materials and reuse them across multiple projects, saving you a significant amount of time and effort. Furthermore, using a well-organized library ensures consistency in your work, and makes it easier for collaboration if working on a team.
Consider a logical folder structure within your library, grouping materials by type (wood, metal, fabric, etc.) or project.
Lighting and Rendering in 3D Studio Max
Okay, so we’ve got our models looking sweet, textures dialed in—now it’s time to bring it all to life with lighting and rendering. This is where your scene really pops, going from a cool 3D model to a photorealistic masterpiece (or a stylized banger, depending on your vibe). We’ll cover setting up realistic interior lighting, breaking down different render engines, and optimizing those render settings for speed and quality.
Realistic Interior Lighting Setup
Achieving realistic lighting in an interior scene involves understanding the interplay of light sources, their intensity, and how they bounce and interact with surfaces. For a realistic feel, we generally want a mix of key, fill, and rim lighting. Think of it like a real-world room: you’ve got your main light source (maybe a window or overhead fixture), a softer fill light to reduce harsh shadows, and some accent lighting to highlight certain areas or objects.Let’s imagine we’re lighting a living room.
A large window on one side could act as our key light, providing a bright, natural illumination. A less intense lamp on a side table could serve as a fill light, softening the shadows cast by the window. Finally, small strategically placed lamps or spotlights could act as rim lights, highlighting the edges of furniture or artwork, adding depth and interest.
The color temperature of the light sources should also be considered; the window light might be a cool 6500K, while the lamps could be a warmer 2700K. This variation adds realism and visual appeal. Remember to use light modifiers like area lights or IES profiles for more realistic soft shadows. Experiment with different light intensities and positions to achieve the desired mood and realism.
Comparison of Render Engines: Arnold and V-Ray
ds Max offers a range of render engines, each with its own strengths and weaknesses. Arnold and V-Ray are two of the most popular choices, both known for their high-quality output, but they differ in their approach.Arnold, developed by Autodesk, is known for its speed and ease of use, particularly for physically-based rendering (PBR). It excels in handling complex scenes with many objects and offers a good balance between render time and image quality.
Its node-based material system is intuitive, making it relatively straightforward to create complex materials.V-Ray, developed by Chaos Group, is a powerful and versatile renderer renowned for its realism and control. It boasts a wide range of features, including advanced global illumination algorithms and physically accurate material models. V-Ray often produces incredibly detailed and realistic images, but it can be more computationally demanding than Arnold, requiring more powerful hardware for complex scenes.
Its material system, while very powerful, can have a steeper learning curve.The best choice depends on your project’s specific needs and your own preferences. If you need speed and ease of use, Arnold might be a better fit. If you prioritize ultimate realism and control, V-Ray could be the way to go. Consider factors like scene complexity, required render time, and your own familiarity with each engine.
Optimizing Render Settings for Performance and Quality
Before hitting that render button, optimizing your settings is crucial for both speed and image quality. A poorly configured render can take hours, even days, to complete, while a well-optimized render can deliver stunning results in a fraction of the time.First, consider your resolution. Rendering at a lower resolution for previews can significantly speed up the process. Once you’re happy with the lighting and composition, you can render at your final, higher resolution.Next, experiment with sampling settings.
Higher sampling values generally lead to cleaner renders with less noise, but they increase render times. Start with a lower value for quick previews and gradually increase it until the noise is acceptable. Adaptive sampling is a great feature that automatically adjusts the sampling based on the complexity of the scene, helping to balance speed and quality.Finally, look into using render layers.
By separating elements of your scene into different layers (e.g., background, characters, lighting), you can render them separately and combine them later. This allows for greater control and flexibility in post-processing, as well as the ability to render parts of the scene at different settings. For example, you might render the background at a lower resolution to save time, while rendering the characters at a higher resolution for better detail.
Remember to save frequently and test different settings to find the optimal balance between speed and quality for your project.
Animation in 3D Studio Max
Animating in 3D Studio Max opens up a world of creative possibilities, from simple character movements to complex physics simulations. This section will explore the fundamental techniques and workflows for bringing your 3D models to life. We’ll cover creating a walk cycle, animating objects with realistic physics, and comparing different animation methods.
Creating a Simple Walk Cycle Animation for a Bipedal Character
Animating a walk cycle is a foundational skill in 3D animation. It involves creating a believable and natural-looking walking motion for a character. This process typically starts with setting up a biped character rig, a skeletal structure that controls the character’s movement. In 3D Studio Max, you can use the built-in Character Studio or a third-party rigging solution.
Once the rig is in place, you’ll use keyframing to define the character’s pose at specific points in time. For a walk cycle, key poses include the contact pose (when the foot is planted on the ground), the passing pose (when one leg is passing the other), and the high pose (when the leg is lifted highest). You’ll then adjust the in-between frames to create a smooth transition between these key poses.
Careful attention to the timing and spacing of the steps is crucial for a realistic result. Experimentation and iteration are key to refining the walk cycle until it feels natural and engaging. The process often involves subtle adjustments to the hips, knees, and feet to create a believable weight transfer and momentum.
Animating a Complex Object with Realistic Physics, 3d studio max
Animating complex objects with realistic physics requires a different approach than character animation. Instead of relying primarily on keyframing, you’ll leverage 3D Studio Max’s physics engine. This involves setting up constraints, forces, and collisions to simulate how the object would behave in the real world. For example, animating a stack of books falling would involve assigning mass and gravity to each book, setting up collision detection between them, and potentially adding constraints to keep them somewhat together initially.
The level of realism depends on the complexity of the physics simulation and the accuracy of the object’s properties. Consider the use of dynamic simulations for things like cloth, hair, and fluids. These often require careful parameter adjustments to avoid overly chaotic or unrealistic results. You might use particle systems to simulate smoke or dust, adding to the overall visual impact.
Comparison of Keyframing and Motion Capture
Keyframing and motion capture represent two distinct animation techniques. Keyframing involves manually setting key poses and adjusting in-between frames to create animation. It provides complete creative control, but can be time-consuming and requires a strong understanding of animation principles. Motion capture (mocap), on the other hand, involves capturing the movement of a real actor using specialized equipment and then applying that data to a 3D model.
Mocap is faster for complex animations, but requires specialized equipment and can result in data that needs significant cleaning and retargeting to fit the 3D model. A common workflow involves using mocap as a base and then refining the animation through keyframing to add detail and correct any artifacts. The choice between these techniques depends on the project’s scope, budget, and desired level of realism.
For example, a short, stylized animation might benefit from keyframing, while a feature film with complex character interactions might rely heavily on motion capture.
Plugins and Extensions for 3D Studio Max
Okay, so we’ve covered the basics of 3ds Max – modeling, texturing, lighting, the whole shebang. Now let’s talk about the real fun stuff: plugins! These bad boys can seriously supercharge your workflow and unlock features that aren’t built into the core software. Think of them as power-ups for your 3D modeling arsenal.
Plugins essentially add functionality to 3ds Max, expanding its capabilities and often streamlining your processes. They range from simple tools to complex suites offering specialized features. Choosing the right plugins depends heavily on your specific needs and project types. Some are free, while others come with a price tag, offering various subscription models or one-time purchases.
Five Popular Plugins and Their Functionalities
Here are five popular plugins that illustrate the wide range of possibilities available. Each one addresses a specific need or enhances a particular aspect of the 3D pipeline.
- V-Ray: This rendering engine is a powerhouse, known for its photorealistic results and efficient rendering times. It offers advanced features like global illumination, subsurface scattering, and a wide array of material shaders, enabling you to create stunning visuals. The benefits include improved realism and faster render times compared to the default 3ds Max renderer.
- Forest Pack: This plugin is a lifesaver for creating realistic vegetation and crowds. Instead of manually placing thousands of trees or people, Forest Pack lets you quickly populate your scenes with realistic-looking instances, significantly speeding up the environment creation process. The benefits include increased efficiency and the ability to create complex scenes quickly.
- RailClone: Need to create repetitive elements like fences, walls, or roads? RailClone excels at this. It uses a node-based system to create complex geometries quickly, and you can easily edit them globally. The benefit is the efficiency and control in creating repetitive elements, saving considerable time.
- fSpy: This plugin helps you create accurate perspectives from photographs. You simply import a reference image, and fSpy analyzes it to extract camera parameters, enabling you to create a 3D scene that perfectly matches the photograph. The benefit is improved accuracy and ease in recreating real-world scenes in 3D.
- Quixel Megascans: While not strictly a plugin in the traditional sense, it integrates seamlessly with 3ds Max. Megascans provides access to a massive library of high-resolution scanned textures and 3D models, saving you tons of time on asset creation. The benefit is immediate access to high-quality assets, allowing you to focus on the creative aspects of your project.
Installing and Configuring a Plugin: Example with V-Ray
The installation process varies depending on the plugin, but generally involves downloading the installer from the developer’s website and following the on-screen instructions. Let’s take V-Ray as an example. You’d typically download the installer, run it, select your 3ds Max version, and follow the prompts. After installation, you’ll need to configure some settings within 3ds Max, such as selecting V-Ray as your renderer in the render setup.
This often involves accessing the V-Ray specific settings panels within 3ds Max to adjust render parameters like image size, sampling, and lighting settings.
Plugin Feature and Pricing Comparison
Here’s a comparison of three popular plugins – focusing on key features and pricing models (note that pricing can change, so always check the developer’s website for the most up-to-date information):
| Plugin | Key Features | Pricing Model | Target User |
|---|---|---|---|
| V-Ray | Photorealistic rendering, advanced materials, global illumination | Subscription or perpetual license | Architects, product designers, VFX artists |
| Forest Pack | Fast and efficient instance creation for vegetation and crowds | Perpetual license | Environment artists, game developers |
| RailClone | Procedural generation of repetitive elements | Perpetual license | Architects, environment artists, game developers |
3D Studio Max for Game Development
Okay, so you’ve mastered the basics of 3D Studio Max – congrats! Now let’s talk about how to actuallyuse* those skills to make awesome game assets. This section dives into the nitty-gritty of prepping your Max creations for game engines like Unity and Unreal Engine. We’ll cover exporting, optimization, and common pitfalls to avoid.Exporting 3D models and animations from 3D Studio Max for use in a game engine involves a straightforward but crucial process.
Getting this right is the key to a smooth workflow and high-performance games.
Exporting Models and Animations
The process of exporting assets depends heavily on the target game engine. Both Unity and Unreal Engine support a variety of file formats, but FBX is generally preferred due to its broad compatibility and ability to retain animation data. Within 3D Studio Max, you’ll navigate to the export options (usually found under the “File” menu), select FBX as the file type, and then carefully configure the export settings.
This includes specifying units (meters are standard for game development), checking the animation export options, and potentially selecting specific objects to export. Careful attention to these settings prevents common issues like scaling problems or missing animations in the game engine. For example, forgetting to check the “Embed Media” option might cause texture issues in your imported model.
A common mistake is to use the wrong units – if you model in centimeters and export without adjusting the scale, your in-game model will be tiny!
So, I’m totally swamped with a 3D Studio Max project right now – rendering times are insane! To download some extra textures I need a reliable connection, so I’ve been using a free vpn for windows 10 to bypass my school’s bandwidth restrictions. It’s been a lifesaver, letting me actually finish my 3D Studio Max work on time.
Hopefully, this speeds things up enough to finish before the deadline!
Optimization Techniques for Game-Ready Models
Game engines are resource-intensive, and poorly optimized assets will tank your frame rate. Therefore, optimizing your models is crucial. This involves reducing polygon counts, simplifying textures, and using efficient mesh topologies. Low-poly modeling is a key technique, where complex shapes are approximated with fewer polygons, maintaining visual fidelity while minimizing rendering load. Consider using techniques like edge loops and quads to create a clean mesh that’s easy to animate and optimize.
Texture optimization involves reducing texture resolution while maintaining visual quality; using normal maps, specular maps, and other texture maps can add detail without significantly increasing polygon count. For example, a character model might have a 2048×2048 texture for the diffuse map, but a 512×512 normal map can add considerable surface detail without significantly increasing file size. Lastly, baking details like ambient occlusion or normal maps can improve visual fidelity while reducing the overall polygon count.
Challenges and Best Practices for Creating Game Assets in 3D Studio Max
Creating game assets presents unique challenges compared to other 3D modeling tasks. Performance is paramount; a stunningly detailed model that crashes the game is useless. Therefore, balancing visual fidelity with performance is a constant balancing act. A common challenge is maintaining a consistent level of detail across all assets, ensuring that everything fits within the game’s performance constraints.
Best practices include early and frequent testing within the game engine, iterative refinement based on performance profiling, and using modular design techniques to reuse assets and minimize the overall polygon count. For example, creating reusable building blocks for environments (like walls, doors, windows) allows for the creation of diverse scenes without a huge increase in polygon count.
Another important best practice is to use appropriate naming conventions for your files and layers, making it much easier to manage large projects and collaborate with other team members.
Advanced Techniques in 3D Studio Max

Okay, so we’ve covered the basics of 3D Studio Max. Now let’s dive into some seriously cool, advanced stuff that’ll take your models from “meh” to “mind-blowing.” We’re talking about techniques that push the boundaries of realism and add that extra layer of polish that separates the pros from the… well, not-so-pros.This section will explore powerful tools within 3DS Max to achieve photorealistic effects and intricate details, significantly enhancing the quality and realism of your 3D projects.
We’ll cover particle systems for dynamic effects, realistic hair and fur creation, and the use of displacement maps for adding high-resolution details.
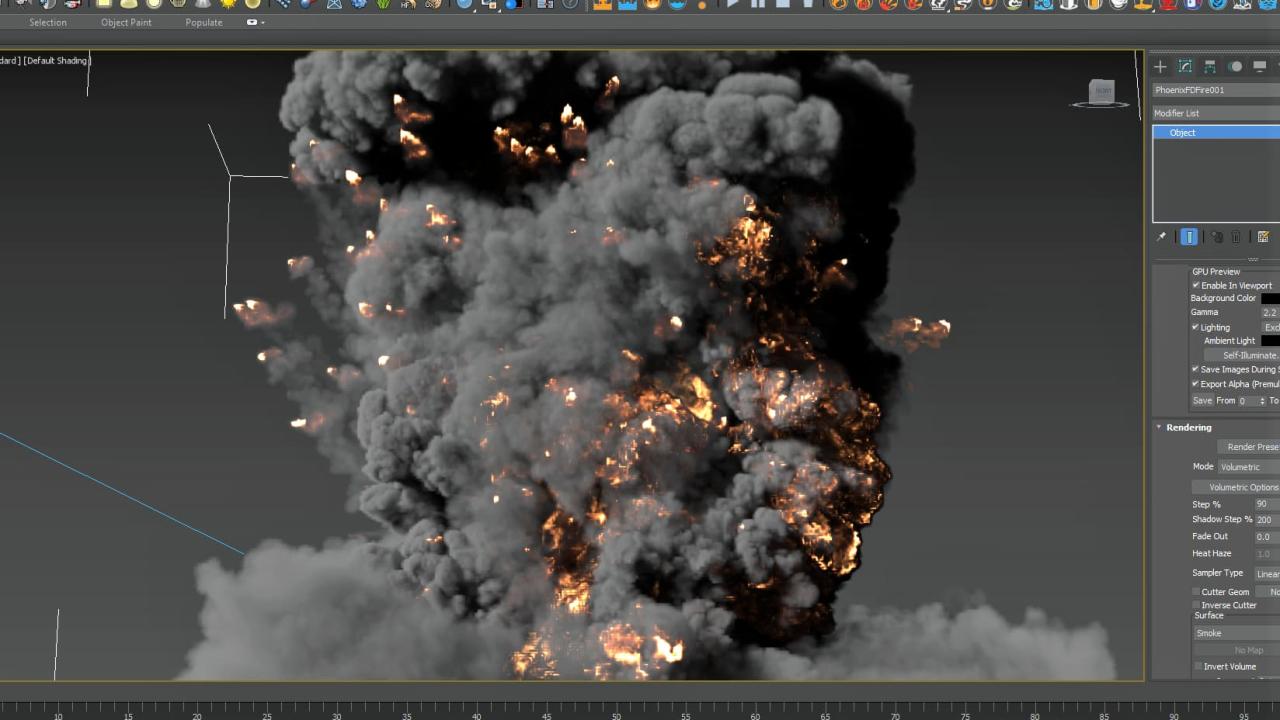
Particle Systems for Realistic Effects
Particle systems in 3DS Max are incredibly versatile tools. They’re not just for simple things like rain or snow; you can use them to create incredibly realistic smoke, fire, explosions, and even liquids. The key is understanding the different parameters and how they interact. For instance, to simulate smoke, you’d adjust parameters like particle size, lifetime, and emission rate.
You’d also use different forces and turbulence to create the swirling, organic movement characteristic of smoke. Imagine creating a realistic campfire scene – the flickering flames, the rising smoke, and even embers floating gently into the air. All of this is achievable through careful manipulation of a particle system’s properties. You can even use different particle types and render settings to get different looks, like a wispy, ethereal smoke versus a thick, heavy fog.
Creating Realistic Hair and Fur
Generating realistic hair and fur is a challenge, but 3DS Max provides several tools to make it manageable. The most common approach involves using hair and fur modifiers. These modifiers allow you to generate individual strands of hair or fur, which can then be styled and rendered. You can control parameters such as the density, length, and curl of the hair, as well as its overall shape and distribution.
Think about the difference between the sleek, straight hair of a fashion model and the thick, shaggy fur of a bear. These vastly different looks are all possible using variations in the hair and fur modifier settings, combined with potentially some additional modeling and texturing. Advanced techniques might include using different shaders to achieve more realistic shine and reflectivity, and even simulating wind effects to add dynamic movement.
Displacement Mapping for High-Resolution Details
Displacement mapping is a fantastic way to add incredibly detailed surface geometry without actually increasing the polygon count of your model. It works by using a grayscale image (the displacement map) to “push and pull” the surface of your model, creating bumps, dents, cracks, and other intricate details. Imagine a highly detailed rock face – creating all those individual crevices and textures by hand would be incredibly time-consuming.
But with a displacement map created from a high-resolution photo or scan, you can add all that detail with ease. The higher the resolution of your displacement map, the more detail you can achieve. The result is a model that looks incredibly realistic and detailed, but remains relatively efficient to render. This is particularly useful when working with high-resolution textures without the performance hit of a highly poly-model.
Troubleshooting Common Issues in 3D Studio Max
So, you’ve conquered modeling, texturing, lighting, and even animation in 3ds Max. Congratulations! But even the most seasoned digital artists encounter frustrating glitches and performance hiccups. This section covers common problems and provides practical solutions to get you back on track to creating awesome 3D worlds. We’ll tackle rendering errors, performance optimization, and model-related issues, providing you with the troubleshooting skills to navigate the inevitable challenges.
Rendering Errors and Crashes
Rendering errors can range from minor artifacts to complete crashes, often stemming from issues within the scene itself or limitations in your system’s resources. Identifying the source is key to resolving these problems efficiently. Common causes include overly complex scenes, memory leaks, and corrupted files.
- Overly Complex Scenes: Extremely detailed models, high-resolution textures, and excessive geometry can overwhelm your system’s processing power, leading to crashes or extremely slow render times. The solution is often simplification. Reduce polygon counts on less-visible objects, use lower-resolution textures where appropriate, and consider using proxy geometry for distant objects.
- Memory Leaks: Memory leaks occur when your software fails to release memory after it’s no longer needed. This gradually consumes available RAM, eventually causing crashes. Restarting 3ds Max frequently can help mitigate this. Also, ensure your system has sufficient RAM; upgrading your computer’s memory can significantly improve stability.
- Corrupted Files: Occasionally, files become corrupted, leading to unpredictable behavior. Try saving your work frequently in different file formats (.max, .fbx) as a preventative measure. If a file is indeed corrupted, attempting to recover it from a backup or previous autosave is crucial.
Optimizing Scene Performance and Reducing Render Times
Rendering times can be a major bottleneck in your workflow. Optimizing your scene can drastically reduce render times without sacrificing visual quality. This involves employing various techniques to improve the efficiency of your scene data.
- Using Unnecessary Lights: Each light source increases render time. Use only the necessary lights and consider using light linking for efficiency. Experiment with light types; area lights, for example, are often more efficient than point lights for large areas.
- High-Resolution Textures: Large texture files consume significant resources. Use appropriate texture resolutions; high-resolution textures are only necessary for close-up details. Consider using texture compression techniques to reduce file sizes without noticeable loss in quality.
- Geometry Optimization: Reduce the polygon count of your models, especially those far from the camera. Employ techniques like level of detail (LOD) modeling, which substitutes high-polygon models with simpler versions at greater distances.
Resolving Issues Related to Model Topology and UV Mapping
Problems with model topology and UV mapping often manifest as visual glitches in the rendered image, such as stretched textures, shading errors, and distorted geometry. Understanding these concepts is essential for creating high-quality 3D models.
- Poor Model Topology: N-gons (polygons with more than four sides) and excessively long or skinny polygons can lead to rendering problems. Use quads (four-sided polygons) whenever possible for clean topology. Use edge loops and smoothing groups to control the flow of polygons and create smoother surfaces.
- UV Mapping Issues: Incorrect UV mapping can result in distorted textures. Ensure your UV seams are strategically placed to avoid stretching and distortion. Check for overlapping UV islands and correct any issues to prevent texture bleeding.
- Using Appropriate Unwrapping Methods: Different unwrapping methods are suitable for different models. Planar mapping is useful for simple, flat surfaces, while cylindrical or spherical mapping works well for objects with cylindrical or spherical shapes. For complex models, consider using automated unwrapping tools, followed by manual adjustments to refine the results.
Case Studies
Okay, so we’ve covered the nuts and bolts of 3D Studio Max. Now let’s dive into some real-world examples to see how these techniques come together in actual projects. We’ll examine a specific project, breaking down the workflow, key decisions, and problem-solving strategies employed. This will give you a much better understanding of how to apply what you’ve learned.This case study will focus on the creation of a realistic architectural visualization of a modern apartment building.
This project showcases the power of 3D Studio Max in creating photorealistic renders for marketing and design purposes. The complexity involved in accurately representing light, materials, and scale will be a primary focus.
Project Workflow: Modern Apartment Building Visualization
The project began with a detailed architectural blueprint provided by the client. The initial phase involved importing the blueprint data into 3D Studio Max and using the modeling tools to create a precise 3D model of the building. This included accurately modeling the building’s exterior, including windows, balconies, and landscaping elements, as well as the interior layouts of several sample apartments.
Subsequent stages focused on material assignment, lighting setup, and final rendering. Key decisions included choosing appropriate rendering engines (V-Ray was used for its photorealistic capabilities) and carefully balancing the time spent on modeling versus the level of detail required for the final renders. A significant challenge was accurately representing the interplay of light and shadow across the building’s complex facade, especially during different times of day.
This required careful placement of virtual lights and extensive experimentation with light modifiers and shadow settings.
Material and Texture Application
Realistic materials were crucial for this project. The team utilized a combination of procedural textures and high-resolution bitmap textures. For example, the building’s exterior was rendered using a combination of procedural concrete textures and displacement maps to create realistic surface imperfections and variations. The windows were modeled with high-quality glass materials to accurately represent reflections and refractions.
Interior materials such as wood flooring, carpeting, and furniture upholstery were modeled using a mix of high-resolution photographs and procedural textures. The attention to detail in material application significantly contributed to the overall realism of the final renders.
Lighting and Rendering Techniques
The lighting setup was designed to mimic natural daylight conditions at different times of the day. This involved using a combination of environment maps, sun and sky lights, and area lights. The use of global illumination techniques within V-Ray allowed for realistic indirect lighting effects. Several test renders were created throughout the process to fine-tune the lighting and ensure the desired mood and atmosphere were achieved.
Final rendering involved high-resolution settings to capture the intricate details of the materials and lighting effects. The rendering process itself took a considerable amount of time, with individual renders often taking several hours to complete, depending on the complexity of the scene.
Achieving Photorealistic Glass
To achieve a photorealistic glass effect, a multi-layered approach was used. First, the glass was modeled with a high refractive index material. Next, a reflection map was added to capture the environment accurately. Finally, subtle imperfections were added using noise maps to break up the perfect reflections and add realism. This layered approach to creating realistic glass is common in architectural visualization and helps to achieve the highly detailed final renders required for marketing materials.
Final Conclusion
So, there you have it – a journey through the exciting world of 3D Studio Max. From the initial hurdle of understanding the interface to the rewarding experience of rendering a stunning final product, we’ve covered a lot of ground. Remember, practice makes perfect. The more you experiment, the more comfortable you’ll become with the software’s capabilities. Don’t be afraid to try new things, explore different techniques, and push your creative boundaries.
The world of 3D modeling is vast and ever-evolving, so keep learning, keep creating, and most importantly, have fun!
Detailed FAQs
What’s the best version of 3D Studio Max to start with?
The latest version usually offers the most features and bug fixes, but older versions might be more affordable or easier to learn. Start with what you can access; the core concepts are largely consistent across versions.
How much RAM do I need for 3D Studio Max?
The more RAM, the better, especially for complex scenes. Aim for at least 16GB, but 32GB or more is recommended for professional work.
Is 3D Studio Max hard to learn?
It has a steep learning curve, but with consistent practice and the right resources (like this guide!), you can master it. Start with the basics and gradually build your skills.
What are some good resources for learning more after this guide?
Check out online tutorials on YouTube, Udemy, and other learning platforms. Autodesk’s official documentation is also a great resource.
Can I use 3D Studio Max for free?
No, 3D Studio Max is a commercial software and requires a license. However, Autodesk sometimes offers free student licenses.